Coffee mousse cake is the perfect combination of rich, bold espresso flavor and light, airy mousse. This dessert is a must-try for coffee lovers who want something that’s both indulgent and satisfying. Whether you’re planning a special celebration or simply craving a delicious homemade treat, this coffee mousse cake will become your go-to dessert.
Let’s walk through the process, step by step, so you can enjoy this heavenly dessert at home. First, prepare the cocoa mixture and whisk until smooth. After assembling the layers, refrigerate the cake to let the flavors meld together for the perfect finish.
Why You’ll Love This Recipe
- Perfect for Coffee Lovers: The deep, rich espresso flavor in this mousse cake will satisfy even the most avid coffee aficionados.
- Light and Fluffy Texture: The mousse is silky, airy, and melts in your mouth, offering a delightful contrast to the coffee base.
- Customizable: Add extra touches like crushed nuts, a hint of liqueur, or a chocolate ganache topping for a personalized twist.
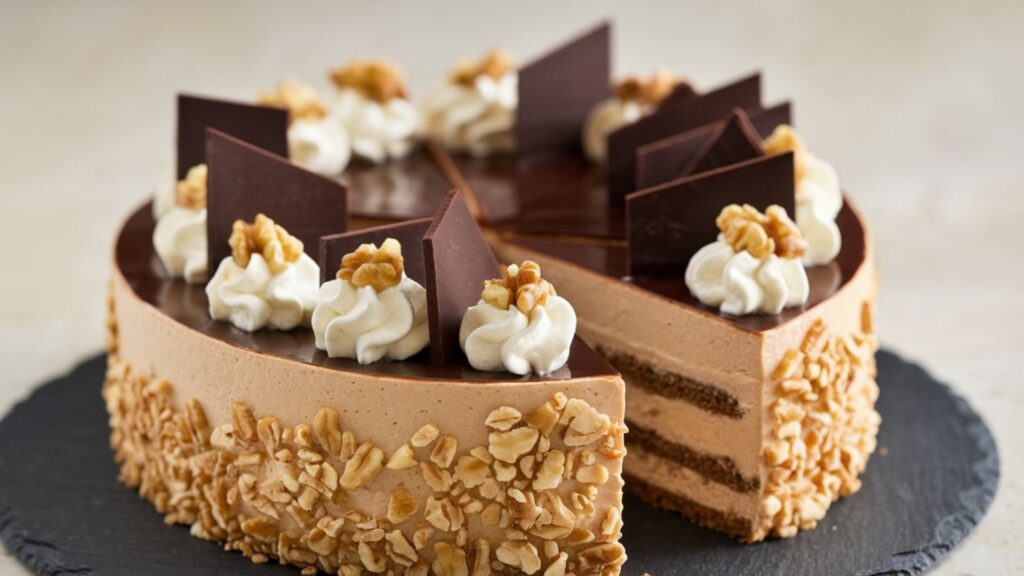
- Impressive and Elegant: It’s a stunning dessert that will impress your friends, family, and guests, making it perfect for gatherings.
- Easy to Make: While the steps may seem detailed, it’s simple enough for even beginner bakers to follow. Start by preparing the cocoa mixture, then whisk it until smooth.
- Gluten-Free Option: With just a swap of ingredients, you can make this cake gluten-free, using almond flour or gluten-free biscuits for the base. Once assembled, refrigerate the cake to allow the flavors to set.
Recipe Overview
- Prep Time: 30 minutes
- Cook Time: 25 minutes
- Total Time: 3 hours (including chilling time)
- Servings: 8-10
- Difficulty Level: Medium
- Dietary Information: Gluten-free (if you use gluten-free biscuits for the base), Vegetarian
This coffee mousse cake has layers of flavor and texture, including a rich, coffee-flavored mousse and a cake base that’s soft and sturdy. It’s topped with an optional chocolate ganache that adds a touch of indulgence to each bite. Plus, the mousse is easy to make and can be chilled to perfection ahead of time, making it a great make-ahead dessert.
Ingredients
For the Coffee Mousse:
- 1 cup heavy cream
- 1/2 cup strong brewed coffee (preferably espresso)
- 1/2 cup sugar
- 3 large eggs
- 1 teaspoon vanilla extract
- 1/4 teaspoon salt
- 2 teaspoons gelatin (or agar-agar for a vegetarian version)
- 1 tablespoon water
For the Cake Base:
- 1 cup almond flour (or gluten-free biscuits, crushed)
- 1/4 cup melted butter
- 2 tablespoons sugar
- 1/4 cup brewed coffee (optional for flavor)
For the Chocolate Ganache (optional):
- 1/2 cup heavy cream
- 1/2 cup semi-sweet chocolate chips
Equipment
- 9-inch springform pan
- Medium saucepan
- Mixing bowls
- Electric hand mixer or stand mixer
- Whisk
- Spatula
- Measuring cups and spoons
- Small bowl for blooming gelatin
Step-by-Step Instructions
1. Prepare the Cake Base
- In a mixing bowl, combine the almond flour (or crushed gluten-free biscuits), melted butter, sugar, and brewed coffee. Stir until everything is evenly mixed.
- Press the mixture into the bottom of your springform pan, making sure it’s compacted well to form a solid base.
- Place the pan in the refrigerator to chill while you prepare the mousse.
2. Bloom the Gelatin
- In a small bowl, sprinkle the gelatin over 1 tablespoon of water and let it sit for 5 minutes to bloom.
- After blooming, gently heat the mixture over low heat until the gelatin dissolves completely. Set it aside to cool.
3. Make the Coffee Mousse
- In a medium saucepan, combine the coffee, sugar, and salt. Heat over medium heat until the sugar dissolves.
- In a separate mixing bowl, whisk the eggs and vanilla extract until well combined.
- Gradually pour the hot coffee mixture into the egg mixture while continuously whisking to temper the eggs.
- Pour the egg-coffee mixture back into the saucepan and cook over low heat, stirring constantly, until it thickens slightly (about 5 minutes).
- Remove from heat and stir in the dissolved gelatin. Let the mixture cool completely.
4. Whip the Heavy Cream
- In a separate bowl, whip the heavy cream with an electric mixer until soft peaks form.
- Gently fold the whipped cream into the cooled coffee mixture, being careful not to deflate the mousse. The result should be smooth and fluffy.
5. Assemble the Cake
- Pour the coffee mousse onto the chilled cake base in the springform pan.
- Smooth the top with a spatula and refrigerate for at least 2-3 hours, or until the mousse is set and firm.
6. Prepare the Chocolate Ganache (optional)
- For the ganache, heat the heavy cream in a saucepan over medium heat until it just begins to simmer.
- Remove from heat and stir in the chocolate chips until smooth and glossy.
- Let the ganache cool slightly before pouring it over the set mousse. Use a spatula to spread it evenly.
7. Serve and Enjoy
- Once the ganache has set, carefully remove the sides of the springform pan.
- Slice and serve the coffee mousse cake to enjoy its rich, creamy, and flavorful layers.
Pro Tips
- Whip the Cream Properly: Be sure to whisk the heavy cream until soft peaks form before folding it into the coffee mixture. This ensures a smooth and airy mousse texture.
- Use Freshly Brewed Coffee: For the best coffee flavor, use freshly brewed espresso or strong coffee. It will give the mousse cake a deep, authentic coffee taste.
- Chill the Cake Well: The mousse needs to be chilled for at least 2-3 hours to set properly. Once assembled, refrigerate the cake to let the flavors meld together. It’s a great make-ahead dessert that you can prepare the day before.
- Add Liqueur for Extra Flavor: For an adult twist, add a tablespoon of Kahlúa, Baileys, or another coffee liqueur to the mousse for enhanced flavor.
- Customize the Base: You can swap the almond flour for gluten-free biscuits to make the base even more decadent, or add a layer of crushed hazelnuts for added texture and flavor. For a richer taste, consider adding a bit of cocoa to the base as well.
Variations You Can Try
1. Coffee and Hazelnut
Add crushed hazelnuts to the cake base for an extra nutty, crunchy texture that pairs beautifully with the espresso mousse.
2. Vegan Version
Use coconut milk or almond milk for the mousse and replace the gelatin with agar-agar for a vegan-friendly alternative.
3. Mocha Version
Add cocoa powder to the mousse for a delightful mocha flavor that combines both coffee and chocolate in every bite.
4. Fruit Layer
Add a layer of fresh berries, like raspberries or strawberries, on top of the mousse before refrigerating for a fruity contrast to the rich, creamy espresso mousse.
Conclusion
Making a coffee mousse cake from scratch may seem daunting at first, but it’s incredibly rewarding. The fluffy, creamy mousse and rich espresso flavor create a dessert that’s perfect for coffee lovers and anyone who appreciates a well-balanced, indulgent treat.
With a few simple ingredients and steps, you can create a show-stopping dessert that’s bound to become your new favorite. Start by preparing the cocoa mixture and whisk it until smooth, then assemble the layers and refrigerate the cake to let the flavors set.
So, why wait? Gather your ingredients, follow the steps, and treat yourself (and your guests) to a slice of this heavenly coffee mousse cake!